In this post, I'm going to show you from start to finish how I built this 1 by 6.5 foot HO scale switching layout.

This layout went through some changes along the way, and I had originally planned on it being a roughly 11 foot long modular switching layout along the wall in our upstairs game room, in the location where my old 5x10 foot HO layout used to be. However, that space wasn't going to work anymore, so I decided to make it a 6.5-foot switching layout that would fit in both a space between bookshelf units in our office as well as fit in the back of our car if I take it to train shows. But, then I redid the floor in our office and rearranged things so the layout no longer fit there. So, it now resides in our garage above my workbench.
Anyway, with those changes in mind, let's look at how I built everything.
I started out using two t-track modules from Masterpiece Modules. The original modular layout was going to have two four foot and one three-foot module. The new layout used a four-foot module and a three-foot module, with 6" cut off one end.


These modules go together easily. A little sanding of the parts is needed, then they just need to be glued and fitted together. A hammer is needed to fully seat all the pieces, but once they are together, the modules are extremely rigid and strong.
I glued and clamped two of the modules together, then glued and tacked on some wood trim pieces to give the layout a more finished look. I also built a backdrop that was attached to the back of the layout using some poplar planks. The trim and backdrop were eventually redone, but this served as the initial layout base for a couple of years. '

The modules have a 1" recess that allows you to put in a layer of foam insulation board. I used some foam board adhesive to glue some insulation foam board panels onto the layout. In retrospect, I should have removed the top portion of the module frames at the joint in the middle of the layout and used one long piece of foam board. Because I didn't, I had to sand everything smooth and use some drywall compound to try and level off the layout surface.

I painted the backdrop a light blue color, but because I never liked how this turned out, the whole backdrop was eventually redone later in the layout build. I also gave the layout a coat of stain to match our office shelves, though this later was painted over when I turned the layout into a shadow box for its permanent home in the garage.
Next, it was time to lay track. I used micro-engineering code-70 track for the layout. I positioned the turnouts on the layout and figured out what size pieces of flex track I needed to cut to link them up. Then I took all the pieces to the workbench, added rail joiners, and connected them, and soldered all the rail joints. I soldered feeder wires to the bottom of the rail joints as well, this way I could drop this complex section of trackwork right onto the layout and have the wiring already done.


I marked places on the layout where I needed the wires to go through, as well as where I wanted uncoupling magnets, and then drilled and cut out those openings. I filled in the openings around the magnets with more patching plaster, glued down the track, and then spray painted everything with camouflage brown spray paint.
Next, I attached my caboose industries ground throws to the turnouts, connected all the wires to a plug on the front of the layout, and used a battery powered Rokuhan throttle to do a test run on the layout.

At this point, it was time to work on the structures and pavement areas. I made templates for the structure base areas using foam core board and figured out where I wanted pavement to go. I used some patching plaster with some paint mixed in for the pavement areas, spreading an even coat over and across the rails as well. I sanded everything down after the first coat of plaster dried, and then applied a second coat in order to get a nice smooth pavement surface. I removed the foam core board forms and templates and then used a ruler and knife to score expansion joints in the concrete areas, remove the plaster along the rails, and clean up the edges.

With the pavement largely done, I shifted gears to building the layout structures. The large structure complex on the layout was built using Walthers modern concrete warehouse kits. I used the regular warehouse and the cold storage warehouse, which is the same structure, but with more detail parts included.
These are modular building kits, and you can arrange the wall panels, loading doors, windows, etc, however you like. Since these were going up against the backdrop, I didn't need to build backs to the structures, and so I had plenty of leftover wall panels for other projects. I glued the loading door and wall panel sections together such that the loading doors would be spaced perfectly for 40-foot box cars, and then just added pieces so the building size matched the template I had made.


You can see where what the finished walls looked like.

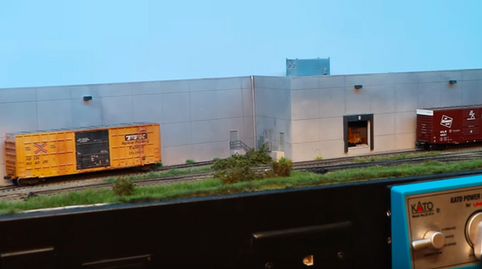
While I can connect a DCC unit to the layout for operation when I want to, I wanted a regular DC throttle in place as well for general use. I decided to use a Kato unit but wanted to mount it upside down so it was easier to use standing up. So, I opened up the unit flipped the controls around, then peeled off the label on the top, turned it around, and stuck it back down. I won't show all the details here, but you can watch the video of that project below:
For the structure on the left side of the layout, I decided to raid my bin of old structures, and use parts from a Walthers bakery building kit for that structure. I glued those in place in the corner of the layout and added a bit of gravel around the tanks, and a bit of grass and a tree on the other side of the building to help hide where it meets the backdrop.

Next, I worked on building roofs for the larger structures on the layout, cutting pieces of roof sections from the building kit to fit the triangular building units. I used a piece of pine on the back of the structures to add a lot of strength and rigidity instead of using a back to the structure.

I added some scene master lights above the loading doors and then weathered the structures with a black wash and some pan pastels. I glued the structures to the layout, then added a ballast mix along the front edge of the structures, along with some static grass tufts, some broken pallets, and some cardboard boxes.

On the larger structure, I had one of the loading doors open, and built a little room behind the door that I painted grey, and added a forklift and a few details to make it look like the structure has an actual interior.

I wanted a drainage creek along the front of the layout, so I carved that into the foam and built up the banks using some sculptamold. For the culvert opening, I used the top of an N scale tunnel portal I had laying around.
I painted the draining creek area brown, added some dirt, and then a layer of static grass.

When testing the layout with the structure in place it turned out the track was a little too close to the loading doors and cars would scrape against a couple of them. I damaged the track trying to move it over, so I had to fully remove that section of track and glue down a new piece.
I used another old building section from my used building bin, and glued that to the other end of the layout, using some trees and shrubs, and grass to help hide the edges.
I ballasted all of the remaining track areas, added some ground foam in between the tracks, and glued everything down with scenic cement.

Next, I made a couple of large trees for the layout using some sagebrush trunks and pieces of supertree material for the smaller branches. I won't go into detail since I eventually removed them anyway as they got in the way of operations. But, I painted the resulting tree armatures and covered them with a few layers of ground foam and scale leaves. They looked good but just made it hard to reach around them to uncouple cars and so forth.


At this point, I finished up the remaining ballasting around the turnouts, added a black wash to the track to give the appearance of grease and oil stains, and added some additional scenery bits in place.
One of the last scenery pieces to do was to add some fencing to the layout. I used an Alkem scale models fencing kit which has some barbed wire on top which I like. I glued segments together, added some pieces of piano wire every few fence posts, and then poked holes in the scenery where each of those wire posts would be located, and then glued the fence in place.

The fencing looks really nice and is fairly easy to install. The barbed wire in particular is delicate, so you have to be careful not to tear that off when installing the fence.
The last scenery item to do was to pour some resin in place for the drainage creek. I used two-part Envirotex epoxy for the water, mixing up a small batch and pouring that in place. I used a lighter to help remove the air bubbles, but blowing on the epoxy through a straw also works.

So, at this point, the layout was about done, but then I decided to redo things. I didn't quite like how the scenery looked, didn't like the backdrop, and wanted a way to cover the layout so it would stay clean in the garage. So, I decided to build the layout into a shadowbox, and take care of some of the things I didn't like, and also finish wiring up the structure lighting.
First, I needed to cut out some openings for battery holders and a toggle switch to power and control the layout lighting. I decided to make the lighting battery powered since I can already operate the layout with a battery-powered throttle unit and so that would make it easy to take to display at train shows if I decide to do that eventually.
I drilled holes in the corners of the opening I needed to make for the battery holder and then used a spade bit to drill a hole for the toggle switch. I used my coping saw to cut out the opening for the battery holder, although a jigsaw would have been a little faster. I test fit the battery holder then glued it in place with some hot glue. I attached the toggle switch to a left over cover from a project box and then hot glued that in place as well.

With the lights wired up, I wanted to move onto some scenery work. While the scenery was already done, I didn't really like how it looked, and the large trees got in the way of operations. I removed the largest tree and then scrapped off some of the existing scenery. I decided to use a static grass mat that I cut to size for the front of the layout. This worked really well, though I could have just as easily broken out the static grass applicator. But, since I hadn't used a static grass mat before, I wanted to try that out. I applied some additional pieces of shrub material that I saved from the original scenery, and then glued everything down with my usual diluted matte medium mixture.

Next, since I wanted to build the layout into a shadow box, I needed to remove the existing backdrop. I was worried the structures would be damaged when removing the backdrop, but the backdrop came off easily without any issues. I built the shadow box out of some 1/2" birch plywood. I ripped down the plywood into the approximately 14" width of the layout and test-fit the end pieces. I had to splice together a few pieces of plywood for the top since I didn't have a single piece long enough. I test fit that and then sanded everything with my orbital sander, patched the seams, and when that was dry and sanded again, I painted the inside of all the pieces with white paint to serve as a primer.

I glued and nailed the sides to the top of the shadow box unit and then glued and nailed on a 1x2 piece of clear pine to the top to add needed rigidity to the long span of plywood.
I test it the shadow box on the layout once again, and then took a piece of 1/4" MDF and propped it up against the back of the layout. I used a pen to trace out where I needed to cut the MDF to fit snuggly against the side and top. I cut that piece to size, and then made a notch on one end to fit around the raised side of the layout. I put that piece on the layout, and took my next sheet of MDF and again traced out the area I needed to cut, and cut that sheet to size as well.

I used my framing square to make sure everything was lined up properly and proceeded to glue on a splice plate on the back along with strips of 1/2" by 2" pieces of poplar. These were added to provide stiffness to the backdrop and to provide more material for attaching the backdrop to the sides and top of the shadowbox. I also glued on a couple of pieces of MDF on the bottom that extended down a few inches so I could attach those to help hold the backdrop to the base of the layout.

Next, I glued the backdrop in place, using clamps to hold everything securely while the glue dried. While the dogs checked out my progress, I used some patching plaster to fill in the gaps and seams. I later came back and used some painter's caulk along the joint between the backdrop and top as well.
I wanted a very pale blue backdrop color so I mixed up some leftover white paint into one can and then added a dollop of dark blue paint and mixed everything up thoroughly. I painted the entire interior of the shadow box with the light blue paint mixture, let that dry, and then added a second coat.

I also wanted some trees on the backdrop between two of the structures. I cut a piece of chipboard to fit the opening, and then glued on pieces of supertree material. That was then spray painted with camouflage brown and when dry, soaked with diluted matte medium. A couple of layers of green ground foam were then added with a couple of additional coats of the glue mix.

While that dried, I worked on adding the lighting to the top of the shadow box. I used two stick-on LED strip lights I picked up at Home Depot for $10 each. These are USB powered and can be powered for hours using a small battery bank when the layout is traveling or plugged into my outlet when on the shelf above my workbench. I also added a little hot glue in places to make sure the light strips wouldn't fall off a few months from now.

The color-changing LED strips have a slight bluish cast to them when in white light mode which enhances the blue color of the backdrop. I may eventually add a warm white LED light strip to the top as well.
With the painting done and lights installed, I screwed the shadowbox to the layout base and the glued on the tree background in between the two structures on the left side of the layout. I did have to touch up the backdrop paint in a few spots as well.
I glued and nailed a couple of pieces of 1x2 pine to the left and right side of the shadow box and then put the layout up on blocks like an old car.
I painted the exterior of the layout with black paint including the original front fascia. After a second coat of paint, I put on a couple of coats of my usual mix of matte and gloss medium to help protect the paint finish.

To help hide the left side of the layout I made several more trees, using supertree armatures. I sprayed the plant material with camouflage brown paint, and when that was dry, sprayed them down with diluted matte medium and covered them with a couple of shades of ground foam and scale leaves. I poked holes in the scenery on the left side of the layout and then glued those trees in place to hide the end of the track on that side of the layout. These trees really improve the appearance of that end of the layout and make it look like the track continues off the side of the layout.

With the layout about done I test fit it on the shelf above my work desk. I had to take it down to remove a few screws that were in the way, and then put it back up on the shelf. I temporarily held in place with a clamp and then came back and added a few screws to keep it from falling off the shelf.
Lastly, I made a cover for the front of the layout using a few black garbage bags. I taped them together with some packing tape, both front, and back, and then wrapped the bottom of the bags around a strip of poplar and taped that in place as well. The poplar board adds weight to help hold the plastic down and against the front of the layout.

I taped the top of the plastic to the top of the layout using more packing tape and then tested rolling the plastic up and down to see how it would work. I may eventually use some nicer looking plastic, but this will work great for now.
Finally, I numbered my car card slots again, put my car cards back in place and everything was ready for operations once again.
And so that wraps up the 1x6 foot HO scale switching layout.
Here is a look at how the layout is positioned above my work desk in the garage. I'll often operate the layout for 5-10 minutes while waiting for some glue or paint to dry on a project I have at the desk, and so having the layout in the garage is actually something I enjoy now.

Anyway, I hope you enjoyed the Tulsa Spur layout project. This is a fun layout to operate and something like this can be a great first layout to build. If you are interested in building your own switching layout, be sure to check out Lance Mindheim's book on how to build a switching layout. It covers everything you need to know on how to build a layout like this in more detail than I showed here and is a book I often reference.
Here is the compilation video of the layout build:
As an Amazon Affiliate, I earn a commission on all purchases made through Amazon links on this page and website.